Video Studio
Making a video
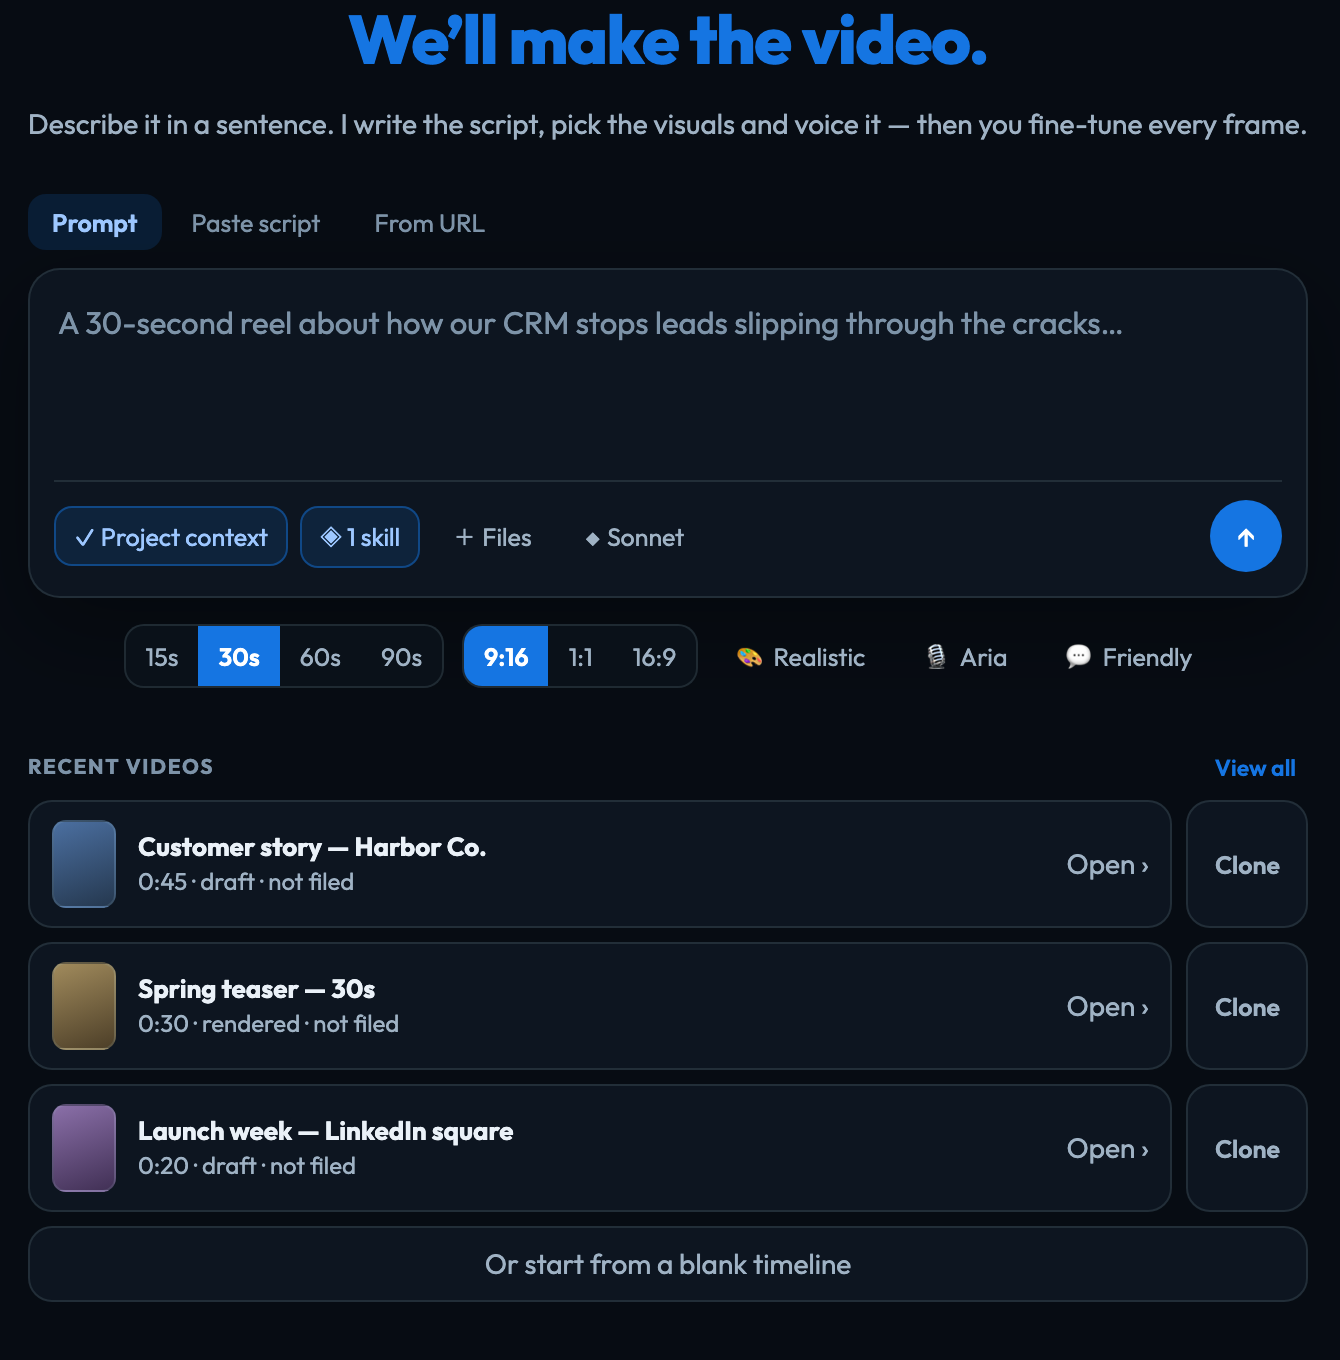
Video Studio turns a project’s pictures, clips and words into a finished MP4 — vertical, square or widescreen. Open a project and choose Video Studio from the search box at the top.
Its own menu on the left has three places: Make a video, Videos (every video in the project) and Media (the pictures, clips and sound it can use).
Describe it and let the AI write it
- On Make a video, describe the video in a sentence, or paste a script.
- Choose the length (15s, 30s, 60s or 90s), the shape (9:16, 1:1 or 16:9), and the style, voice and tone. Optionally press 🧩 No template to choose a template: product launch, explainer, testimonial, course trailer, event promo or social ad. ♫ Music: matched chooses the music: a track matched for you, one you pick, or none.
- Choose what the AI may read: Project context, the project’s skills, and any Files you pick from Data Management.
- Optionally turn on 🎬 Film the scenes with AI (Veo): every scene then gets a shot filmed by Veo, Google’s video model, from its script. You see the total price and confirm on the storyboard before anything is filmed.
- Press the arrow to start. Answer the two quick questions, or press Skip — use your best judgement.
The script is written scene by scene with a voiceover, and the editor opens on it. Writing a script uses AI credit, shown in your usage as Video Studio.
The style and the two answers shape what you get:
- Style sets how the script is written — Cinematic builds and pays off, Minimal keeps to one idea a scene, and so on.
- What should this video focus on? is what the script is built around.
- How should it feel? sets the pace of the script, the scenes’ camera and transitions, and how the voiceover is read:
| Calm and clear | A Calm voice, scenes that Push in, joined by a Fade. |
|---|---|
| Fast and punchy | An Urgent voice, scenes that Push in, joined by a Cut. |
| Warm and personal | A Warmer voice, scenes that Pan, joined by a Fade. |
| Straight to the point | The voice As written, Static scenes, joined by a Cut. |
A template, if you chose one, sets the order of the scenes, and its transitions, camera, caption style and voice take the place of those from How should it feel?; the voice keeps the feel's delivery when you answered it. All of it can be changed in the editor afterwards.
The storyboard
When the script comes with a shot list, it opens on Your storyboard before the editor. Each scene shows its line, its length and what is on screen, which you can change:
| AI shot | A shot the AI films for this scene, from a description of what the camera sees and hears. Edit the description to change it. Optionally choose a picture from Media it Starts on, and one it Ends on: the shot then opens on the first and moves to the second. Each is priced on the storyboard. |
|---|---|
| Your media | One of this project's own pictures or clips. The AI picks one when it clearly fits; choose another from the list. |
| Title card | No picture: the scene's words over your brand background. Free. |
Below the scenes, Music shows the track the video starts with; choose another, or No music, and ▶ Listen to it. Music from the library is free.
Below that, choose Draft (quicker, for a first cut) or Final (the best) for the AI shots, and optionally up to three References for every shot, such as a person, a product or your logo, so they look the same in every shot. A shot with references is 8 seconds, and a scene that starts on a picture does without them, because the AI takes one or the other. The total price is shown before anything is spent; if the shots cannot be made now (not enough AI credit, your monthly usage cap, or the video's spending limit), it says so and the button is greyed out.
Press Make the first cut. When there are AI shots to make, that button names their count and total instead (Film 3 shots — $…) and asks you to confirm before anything is filmed. After you change a scene, the button waits until the new total is worked out; and if the total has gone up by the time you confirm (for instance because the video was changed in another tab), nothing is filmed and the new total is shown. Your pictures and clips are placed under their scenes, the AI shots start, and the editor opens. Each shot lands under its scene as it finishes, filling the frame, with its own sound turned down under the voiceover. A strip under the editor's top bar counts them (Filming with Veo: 1 of 3 ready) until the last one lands; if you reload the page or open the video again meanwhile, it counts the shots still being filmed. Skip — open the editor goes straight to the editor instead.
In the editor, a scene's properties show its AI shot: the description, what it Starts on and Ends on, Draft or Final, and its price. Press Make this shot to film just that scene, or Make this shot again for a new take; the new take replaces the old one on the timeline when it lands (Undo brings the old one back). A scene with no AI shot offers ✦ Film this scene with AI (Veo).
If the script cannot be written, you still get the video as an empty outline with its scenes timed out: fill the lines in yourself, or start again.
Build it yourself
Press Or start from a blank timeline under Recent videos, then add pictures, clips, text and sound. A video can be a run of scenes, each with its own line of narration, or a timeline of layers stacked over time, or both. One made only of layers is perfectly normal.
Start from a video you already have
Press Clone beside any video under Recent videos or on Videos, give the copy a name and press Save. Once you have a video with the intro and outro you want, this is the quickest way to make the next one.
A clone copies the whole timeline — every scene and layer, the shape and the length. It does not copy the original’s exported files, its Data Management entry, its thumbnail or its captions: the copy starts as a draft that has not been exported. Its pictures and clips are shared with the original rather than duplicated, so a clone uses no extra storage.
Deleting a video
On Videos, press Delete on the video and confirm. It is removed from Videos, from Data Management and from your public profile, and an export still waiting to start is called off. Deleting needs the Publisher role or above. The Example cannot be deleted.
The example video
Videos always includes one Example from VeraGen, so you can see how a finished piece fits together. It is read-only. Edit it and you are offered Make me a copy I can edit, which puts your own copy in the project.
If you can only watch
Making, editing, exporting and publishing a video needs the Publisher role or above. A member can open and watch the project’s videos, view-only:
- Make a video says so before there is anything to fill in — "Making or editing a video needs the Publisher role. To edit, ask an owner or admin for Publisher access." — and lists the project’s videos to watch.
- A video opens with the banner View only. To edit, ask an owner or admin for Publisher access. It plays, and you can look at each scene and layer and read their properties (the locked choices are dimmed), but there is no Save, Export, Publish, Preview, Browse media or filming with AI, and nothing in the frame or on the timeline can be moved, trimmed or retyped. The badge beside the name says View only.
- Videos lists every video to watch ("Open one to watch it."), without New video, Clone or Delete.
If an owner or admin has just given you Publisher access, sign out and back in for it to apply. If your role changes while a video is open, the next thing you try is refused, once, and the video switches to view-only:
- If it was an edit, typing in a field included, the banner adds "Your last change could not be saved, so the saved version is on screen." The words you typed are not kept.
- If it was anything else, such as an export, the AI director, filming or the Media Browser, nothing is started, and the page says that making or changing a video needs Publisher access.
Signed in to VeraGen? Press Guide me on any screen for a walkthrough, or ask Odin.